Kubos Linux Overview
Introduction
This is intended as a higher-level overview of the Kubos Linux configuration, installation, and distribution for the Kubos clients’ embedded systems.
The high level components of every system will be: - Low-level bootloader/s - U-Boot (mid-level bootloader. Loads Kubos Linux) - KubOS Linux
Ideally, all the files will be delivered to the customer as a pre-baked OBC. They’ll just need to upload their user app files onto the board.
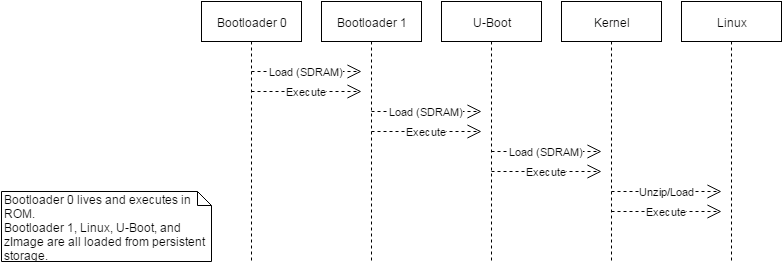
Boot-up UML diagram:

Boot UML Diagram
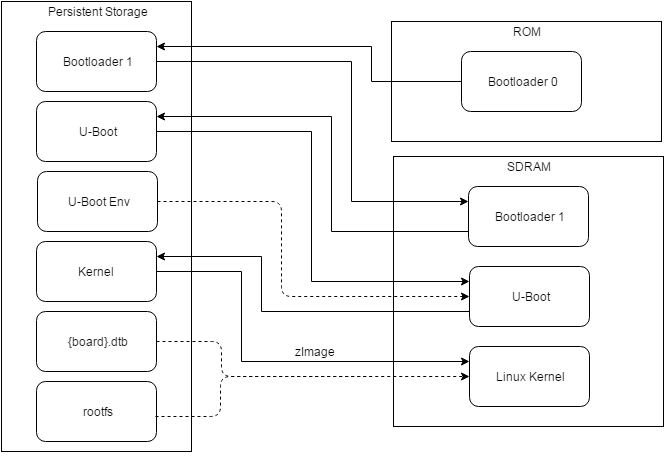
Boot-up with storage flow:

Storage Bootup Flow Diagram
Software Components
Bootloader #0
Each OBC should have an initial bootloader preloaded in ROM. Its job is to load the next bootloader from wherever it’s living into SDRAM to execute. We shouldn’t have to interact directly with this much.
Bootloader #1
This will be highly non-portable. The customer will either need to provide one, or we’ll need to create a custom bootloader for each board that we come across. The main purpose of this bootloader is to load U-Boot from wherever it is located in storage (NOR|NAND|DataFlash|SD @ address) into some location in SDRAM (probably by default, the very beginning of SDRAM)
U-Boot
U-Boot, at the most basic level, is responsible for loading the kernel from the SD card into the SDRAM. However, it also provides a basic OS and CLI which can be used to configure and debug the kernel before it’s loaded.
Additionally, we’ve made some changes to allow us to use it as a kernel upgrade and recovery system. At boot time it will check for available upgrade packages or a corrupted Linux kernel and will then upgrade or rollback the kernel and rootfs as necessary.
Kubos Linux Kernel
The kernel is actually composed of multiple components: the main linux kernel, the libc library, and the command/utility library.
Using BuildRoot allows us to include tools like BusyBox and glibc with the kernel and rootfs at build time.
Due to the portability of Linux, we are able to primarily use a single kernel configuration to build the kernel for all target devices, barring a few architecture-specific options (ARM, OMAP, etc).
zImage
The zImage file is unpacked from the kernel file (which contains headers for checksum validation) and then loaded into SDRAM by U-Boot and contains a compressed version of the Linux kernel. The first few hundred bytes of the file are not compressed and are responsible for uncompressing the rest of the kernel and then kicking off the main kernel execution.
Linux
We’re using Linux 4.4. This is the current long-term support version (LTS) and will be supported until early 2018.
Glibc
We use the standard GNU C library to build our toolchains. We are currently building using v2.23.
BusyBox
We’re currently using v1.25.0.
BusyBox provides many of the common Linux console and shell commands, but in a smaller package. If there are any commands or tools that need to be added, they will likely be added through the busybox configuration.
Currently enabled BusyBox commands:
[, [[, addgroup, adduser, awk, cat, catv, chgrp, chmod, chown,
chpasswd, chroot, cksum, clear, cp, cut, date, deallocvt, delgroup,
deluser, df, dirname, du, dumpkmap, echo, egrep, env, expr, false,
fgrep, find, fold, fsync, getty, grep, gzip, halt, hush, id, ifconfig,
ifdown, ifup, init, inotifyd, ionice, iostat, ip, ipaddr, iplink,
iproute, iprule, iptunnel, kill, killall, killall5, linuxrc, ln,
loadkmap, login, logname, ls, lzcat, lzma, man, mkdir, mknod, mkpasswd,
modinfo, more, mount, mv, nice, passwd, ping, pkill, poweroff,
printenv, printf, ps, pwd, readlink, realpath, reboot, renice, reset,
resize, rm, rmdir, sed, seq, setserial, sh, sha256sum, sha512sum,
sleep, sort, split, start-stop-daemon, stat, stty, sync, tail, tar,
tee, test, time, timeout, top, touch, tr, true, truncate, umount,
uname, uncompress, unlink, unlzma, unshare, unzip, uptime, usleep, vi,
watch, watchdog, wc, which, whoami, yes
Device Tree Binary
This is the memory and capability mapping file that tells Linux what features/peripherals are available on the board and what memory location they’re located at. The human-readable files are *.dts and *.dtsi (.dts-“include”) and are converted into one device tree binary file (*.dtb) at build time.
This is a highly specific file for each board and has similar cases to U-Boot. If we’re lucky, a dtb file will already exist for the exact board that we want. Most likely, there will be dts* files for the CPU, but not the exact board, so we’ll have to modify a file that is close to what we want. If we’re unlucky, we’ll have to write the dts* files from scratch, which will be painful and take a while.
Unfortunately, there isn’t one great tutorial for writing and updating device tree files. It’s very much trial-and-error. I recommend looking at the files for boards with similar processors and peripherals to see examples for the various component definitions.
Note: There is also an option to bake the data from the *.dtb file directly into the zImage file. However, this capability is largely implemented as a support option for older boards and isn’t something that we should need to use.
Connecting to the System
All supported OBCs have a debug UART connection which is intended as the primary way to connect to the system console.
You’ll need to establish a serial connection with the board in order to connect to the console. Set up a serial connection to the board at a baudrate of 115200.
If you have a Kubos Vagrant image currently running, the FTDI connection will
be automatically passed through. You can use the included minicom configuration
to quickly connect to the board via the minicom kubos command in the VM’s
command console.
Note
If a Kubos Vagrant image is running, you will be unable to establish a serial connection on your host machine. You must instead connect to the device through the VM.
$ minicom kubos
If the board is already powered, hit the Enter key to display the login dialog.
If you power the board after starting the minicom session, the end of the boot messages will look like this:
...
Freeing unused kernel memory: 172K (c0401000 - c042c000)
EXT4-fs (mmcblk1p2): re-mounted. Opts: errors=remount-ro,data=ordered
EXT4-fs (mmcblk1p3): mounted filesystem with ordered data mode. Opts: (null)
EXT4-fs (mmcblk0p1): mounted filesystem with ordered data mode. Opts: (null)
Initializing random number generator... random: dd: uninitialized urandom read (512 bytes read, 12 bits of entropy available)
done.
Starting network: OK

Welcome to Kubos Linux
Kubos login:
By default, there are two user accounts available: “root” (the superuser), and “kubos” (a normal user). Both have a default password of “Kubos123”. For more information, see the User Accounts section.
User Space
File System
There are a few key directories residing within the Kubos Linux user space
/usr/sbin
All built-in Kubos services will reside in the /usr/sbin directory. This covers things like the hardware and core services.
/home
All user-created files should reside under the /home directory. This directory maps to a separate partition from the root file system. As a result, all files here will remain unchanged if the system goes through a kernel upgrade or downgrade.
The home directories of all user accounts, except root, should live under this directory.
A special user ‘system’ exists to hold all user application binaries, initialization scripts, and general flash transfer files.
Any files not residing under the /home directory will be destroyed during an upgrade/downgrade
/home/system/usr/bin
All user-created applications will be loaded into this folder during the
kubos flash process. The directory is included in the system’s PATH,
so applications can then be called directly from anywhere, without
needing to know the full file path.
/home/system/usr/local/bin
All user-created non-application files will be loaded into this folder
during the kubos flash process. There is currently not a way to set
a destination folder for the kubos flash command, so if a different
endpoint directory is desired, the files will need to be manually moved.
/home/system/etc/init.d
All user-application initialization scripts live under this directory. The naming format is ‘S{run-level}{application}’.
/upgrade
All *.itb files will reside in this directory. These files are used to upgrade the Kubos Linux kernel and root file system.
Users
By default, there are only two users defined to the Kubos Linux system:
‘root’ and ‘kubos’. To add more users, the Linux adduser or
useradd commands should be used. Other common Linux commands related
to setting passwords and changing permissions are also available.
User home directories should be created as ‘/home/{username}’.
Base user permissions are determined by the default user profile and the default device table, which can be found in the BuildRoot repository in the system/device_table.txt file.
NOTE: User definitions are stored in the /etc directory, which is part of the root file system. As a result, any user definitions that are added or changed will need to be re-added or changed after a system upgrade or downgrade. This behavior will be changed in the future.
Upgrade Process
If you already have Kubos Linux installed on your system, but would like to upgrade to the latest version, check out the Upgrade Installation section. Alternatively, if you would like to rollback to a previously installed version, refer to the Upgrade Rollback section.
Recovery Process
Should your Kubos Linux kernel become corrupted (as indicated by failing to successfully boot into Linux several times), the system will automatically try to recover during the next boot.
It will go through the following steps, if each is present (system will reboot after attempting each step):
- Reload the current version of Kubos Linux from the kpack*.itb file in the upgrade partition
- Reload the previous version of Kubos Linux from the kpack*.itb file in the upgrade partition
- Reload the base version of Kubos Linux from the kpack-base.itb file in the upgrade partition
- Boot into the alternate OS
If none of these steps work, then the system will boot into the U-Boot CLI. From here, some basic troubleshooting and debugging abilities should be available.
More information about the recovery process and architecture can be found in the Kubos Linux Recovery doc
Resetting the Environment
If the system goes through the full recovery process, you will need to reset the environment in order to resume the normal boot process.
From the U-Boot CLI:
$ env default bootcmd
$ env default bootcount
$ env default recovery_available
$ saveenv
$ reset
These commands will:
- Restore the relevant environment variables to their default values
- Save the new values to persistent storage
- Reboot the system
As long as a valid kernel and rootfs are available, your system should now successfully boot into Kubos Linux.