Creating Your Communications Service
All satellites must be capable of communicating with the ground. The method used for this communication varies greatly from mission to mission. As a result, a communications service which facilitates passing messages between the radio/s and the rest of the satellite must be constructed on an individual basis.
This tutorial walks the user through the process of using the communications service framework in order to create a basic hardware service for a radio. To allow testing, the radio connection will be simulated by a UART connection.
Overview
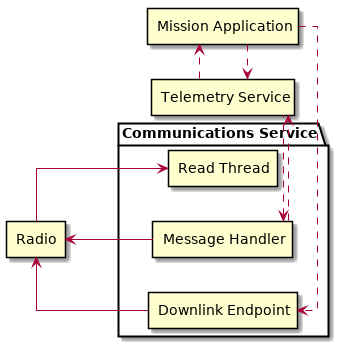
The communications service works by maintaining a read thread which fetches incoming messages from the radio. It then parses the intended internal destination, forwards the message on, and waits for a response. Once a response is received, it can be sent to the radio, to then be transmitted to the ground.
For this tutorial, we’ll be setting up the functions needed to read and write from a UART port (the “radio”), passing them to the standard communications service framework implementation, and then creating a GraphQL front-end to fetch communications statistics from.
This tutorial will not cover:
- Downlink endpoints
- Radio packet framing
A more in-depth example can be found in the Kubos repo.
Configuration
Before we write any actual code, we want to update our system’s config.toml file.
We’ll name our service radio-service. Under this new service name, we’ll be adding two sections:
- A
radio-service.addrsection to define the IP and port for the GraphQL endpoint of our service - A
radio-service.commssection to define our communications settings
For the address section, we’ll use the internal IP address, 0.0.0.0, and port 8150.
In the comms section, we’ll define our satellite’s IP address as 0.0.0.0, since internally our
tutorial satellite’s services all use different ports on the same IP address.
We’ll set our request timeout to one second.
The other options will be omitted, so the default values will be used. This means that the service will be allowed to process up to 50 simultaneous incoming messages and no downlink endpoints will be created.
The final config.toml section should look like this:
[radio-service.addr]
ip = "0.0.0.0"
port = 8150

[radio-service.comms]
timeout = 1000
ip = "0.0.0.0"
Writing the Service
Now we can start our actual tutorial project.
All work will be done within a new Rust project, radio-service, which is created by running
cargo new --bin radio-service.
Cargo.toml
Edit the Cargo.toml file to have the following dependencies:
comms-service = { git = "https://github.com/kubos/kubos" }
failure = "0.1.2"
juniper =  "0.11"
kubos-service = { git = "https://github.com/kubos/kubos" }
kubos-system = { git = "https://github.com/kubos/kubos" }
log = "^0.4.0"
serial = "0.4"
All the dependencies, with the exception of serial, should be common to all services
implementing the communications service framework.
The serial dependency is included in order to provide support for UART communication.
Note
This tutorial was written using the 2018 edition of Rust
Helper Functions
There are a few helper functions which we’ll need to set up for our main program to use.
There are three radio-specific functions which we’ll need to define: initialization, write, and read.
Additionally, we’ll need to set up our logging so that status and error messages can be properly recorded.
Logging
We’ll start by initializing our logging:
use kubos_service::Logger;
use log::*;

fn main() {
    // Initialize logging for the service
    Logger::init("radio-service").unwrap();
}
Serial Initialization
The initialization function will need to create a connection to the serial port and set the port’s communication settings. It should return the final connection object in a mutex, since it will need to be shared across multiple threads.
use std::sync::{Arc, Mutex};

const BUS: &str = "/dev/ttyS2";
const TIMEOUT: Duration = Duration::from_millis(100);

// Initialize the serial bus connection for reading and writing from/to the "radio"
pub fn serial_init() -> ServiceResult<Arc<Mutex<RefCell<serial::SystemPort>>>> {
    // Define our serial settings
    let settings = serial::PortSettings {
        baud_rate: serial::Baud115200,
        char_size: serial::Bits8,
        parity: serial::ParityNone,
        stop_bits: serial::Stop1,
        flow_control: serial::FlowNone,
    };

    // Open a connection to the serial port
    let mut port = serial::open(BUS)?;

    // Save our settings
    port.configure(&settings)?;
    port.set_timeout(TIMEOUT)?;

    // Wrap the port in a mutex so that multiple threads can access it
    let conn = Arc::new(Mutex::new(RefCell::new(port)));

    Ok(conn)
}
Write
Writing to the “radio” is straight-forward in this case. There’s no need to encapsulate the data in a radio-specific protocol (like AX.25) before writing it.
Worth noting: if a mission’s radio does require some sort of additional framing, this would be the location where that wrapping logic would occur.
The function should take two arguments: the data to write and the serial port to write to. We’ll need to take ownership of the mutex and then perform a UART write.
// The write function that the comms service will use to write messages to the "radio"
//
// This function may be called from either a message handler thread or from a downlink endpoint
pub fn write(conn: &Arc<Mutex<RefCell<serial::SystemPort>>>, msg: &[u8]) -> ServiceResult<()> {
    let conn = match conn.lock() {
        Ok(val) => val,
        Err(e) => bail!("Failed to take mutex: {:?}", e),
    };
    let mut conn = conn.try_borrow_mut()?;

    conn.write(msg).and_then(|num| {
        debug!("Wrote {} bytes to radio", num);
        Ok(())
    })?;

    Ok(())
}
Read
The read function will take ownership of the mutex and then wait for a message from the “radio”.
It should continue to attempt to fetch messages until either:
- A message is returned
- A non-timeout error is encountered
The read loop should take care to free the mutex after each read attempt so that any threads wanting to perform write operations are not perpetually blocked.
// The read function that the comms service read thread will call to wait for messages from the
// "radio"
//
// Returns once a message has been received
const MAX_READ: usize = 4096;
pub fn read(conn: &Arc<Mutex<RefCell<serial::SystemPort>>>) -> ServiceResult<Vec<u8>> {
    loop {
        // Note: These brackets force the program to release the serial port's mutex so that any
        // threads waiting on it in order to perform a write may do so
        {
            // Take ownership of the serial port
            let conn = match conn.lock() {
                Ok(val) => val,
                Err(e) => {
                    error!("Failed to take mutex: {:?}", e);
                    panic!();
                }
            };
            let mut conn = conn.try_borrow_mut()?;

            // Try to get a message from the radio
            let mut packet: Vec<u8> = vec![0; MAX_READ];
            match conn.read(packet.as_mut_slice()) {
                Ok(num) => {
                    packet.resize(num, 0);

                    debug!("Read {} bytes from radio", packet.len());
                    return Ok(packet);
                }
                Err(ref err) => match err.kind() {
                    ::std::io::ErrorKind::TimedOut => {}
                    other => bail!("Radio read failed: {:?}", other),
                },
            }
        }

        // Sleep for a moment so that other threads have the chance to grab the serial port mutex
        thread::sleep(Duration::from_millis(10));
    }
}
Beaglebone Black
The Beaglebone Black’s UART kernel driver has a peculiar behavior where it will only read, at most, 48 bytes at a time before triggering an interrupt and returning the bytes to the read caller.
As a result, we’ll need to modify our read function to continue to make read calls until either a) we read less than 48 bytes in one go, or b) the read call returns a timeout.
The resulting function should look like this:
// The read function that the comms service read thread will call to wait for messages from the
// "radio"
//
// Returns once a message has been received
const MAX_READ: usize = 48;
pub fn read(conn: &Arc<Mutex<RefCell<serial::SystemPort>>>) -> ServiceResult<Vec<u8>> {
    loop {
        // Note: These brackets force the program to release the serial port's mutex so that any
        // threads waiting on it in order to perform a write may do so
        {
            // Take ownership of the serial port
            let conn = match conn.lock() {
                Ok(val) => val,
                Err(e) => {
                    error!("Failed to take mutex: {:?}", e);
                    panic!();
                }
            };
            let mut conn = conn.try_borrow_mut()?;

            // Loop until either a full message has been received or a non-timeout error has occured
            let mut packet = vec![];
            loop {
                let mut buffer: Vec<u8> = vec![0; MAX_READ];
                match conn.read(buffer.as_mut_slice()) {
                    Ok(num) => {
                        buffer.resize(num, 0);
                        packet.append(&mut buffer);

                        debug!("Read {} bytes from radio", packet.len());

                        if num < MAX_READ {
                            return Ok(packet);
                        }
                    }
                    Err(ref err) => match err.kind() {
                        ::std::io::ErrorKind::TimedOut => {
                            if packet.len() > 0 {
                                return Ok(packet);
                            } else {
                                break;
                            }
                        }
                        other => bail!("Radio read failed: {:?}", other),
                    },
                };
            }
        }

        // Sleep for a moment so that other threads have the chance to grab the serial port mutex
        thread::sleep(Duration::from_millis(10));
    }
}
Main Logic
Now that the helper functions are in place, we can set up our main service logic.
Our project will need to:
- Start logging
- Intialize the connection with the serial port
- Fetch the configuration settings from the
config.tomlfile- Setup the final communication configuration
- Start the communication service thread
- Start the GraphQL endpoint logic which will loop forever to keep program from ending
Configuration
After setting up logging, we’ll want to fetch our service’s configuration settings from the
config.toml file and extract the communications settings:
fn main() -> ServiceResult<()> {
    // Initialize logging for the service
    Logger::init("radio-service").unwrap();

    // Get the main service configuration from the system's config.toml file
    let service_config = kubos_system::Config::new("radio-service")?;

    // Pull out our communication settings
    let config = CommsConfig::new(service_config)?;
}
Communication Initialization
Now we’ll be setting up our instance of the CommsControlBlock, which is the main control structure used by the communications service framework in order to store all of the settings and communication components.
The CommsControlBlock contains five elements:
- A pointer to the function used to read messages from the radio
- A list of pointers to functions used to write messages to the radio
- The entity used to connect to the radio to read messages
- The entity used to connect to the radio to write messages
- The communication settings extracted in the previous step
Since we’re using a single UART port for our communication, the read and write entities will be the same: the initialized port structure.
Our read function pointer will correspond with the read helper function we created previously.
The write function list will consist of a single entry: the write helper function.
The initialization should look like this:
fn main() -> ServiceResult<()> {
    // Initialize logging for the service
    Logger::init("radio-service").unwrap();

    // Get the main service configuration from the system's config.toml file
    let service_config = kubos_system::Config::new("radio-service")?;

    // Pull out our communication settings
    let config = CommsConfig::new(service_config)?;

    // Initialize the serial port
    let conn = serial_init()?;

    // In this instance, reading and writing are done over the same connection,
    // so we'll just clone the UART port connection
    let read_conn = conn.clone();
    let write_conn = conn;

    // Tie everything together in our final control block
    let control = CommsControlBlock::new(
        Some(Arc::new(comms::read)),
        vec![Arc::new(comms::write)],
        read_conn,
        write_conn,
        config,
    )?;
}
Starting Communication
Finally, we can start our communication threads. We’ll use the CommsService::start function, passing it our control block as well as a CommsTelemetry instance to use for recording communication metrics.
For the moment, we’ll put a loop at the end of our program to keep from exiting.
fn main() -> ServiceResult<()> {
    // Initialize logging for the service
    Logger::init("radio-service").unwrap();

    // Get the main service configuration from the system's config.toml file
    let service_config = kubos_system::Config::new("radio-service")?;

    // Pull out our communication settings
    let config = CommsConfig::new(service_config)?;

    // Initialize the serial port
    let conn = serial_init(BUS)?;

    // Set up the comms configuration
    // In this instance, reading and writing are done over the same connection,
    // so we'll just clone the UART port connection
    let read_conn = conn.clone();
    let write_conn = conn;

    let control = CommsControlBlock::new(
        Some(Arc::new(read)),
        vec![Arc::new(write)],
        read_conn,
        write_conn,
        config,
    )?;

    // Set up our communications telemetry structure
    let telemetry = Arc::new(Mutex::new(CommsTelemetry::default()));

    // Start the comms service thread
    CommsService::start::<Arc<Mutex<RefCell<serial::SystemPort>>>, SpacePacket>(control, &telemetry)?;

    // TODO: Start the GraphQL service
    loop {}
}
Final Code
All together, our code so far should look like this:
// Return type for this service.
type ServiceResult<T> = Result<T, Error>;

use comms_service::*;
use failure::*;
use kubos_service::Logger;
use log::*;
use serial;
use serial::prelude::*;
use std::cell::RefCell;
use std::io::prelude::*;
use std::sync::{Arc, Mutex};
use std::thread;
use std::time::Duration;

const BUS: &str = "/dev/ttyS2";
// Maximum number of bytes to attempt to read at one time
const MAX_READ: usize = 48;
const TIMEOUT: Duration = Duration::from_millis(100);

// Initialize the serial bus connection for reading and writing from/to the "radio"
pub fn serial_init(bus: &str) -> ServiceResult<Arc<Mutex<RefCell<serial::SystemPort>>>> {
    let settings = serial::PortSettings {
        baud_rate: serial::Baud115200,
        char_size: serial::Bits8,
        parity: serial::ParityNone,
        stop_bits: serial::Stop1,
        flow_control: serial::FlowNone,
    };

    let mut port = serial::open(bus)?;

    port.configure(&settings)?;
    port.set_timeout(TIMEOUT)?;

    // Wrap the port in a mutex so that multiple threads can access it
    let conn = Arc::new(Mutex::new(RefCell::new(port)));

    Ok(conn)
}

// The read function that the comms service read thread will call to wait for messages from the
// "radio"
//
// Returns once a message has been received
pub fn read(conn: &Arc<Mutex<RefCell<serial::SystemPort>>>) -> ServiceResult<Vec<u8>> {
    loop {
        // Note: These brackets force the program to release the serial port's mutex so that any
        // threads waiting on it in order to perform a write may do so
        {
            // Take ownership of the serial port
            let conn = match conn.lock() {
                Ok(val) => val,
                Err(e) => {
                    error!("Failed to take mutex: {:?}", e);
                    panic!();
                }
            };
            let mut conn = conn.try_borrow_mut()?;

            // Loop until either a full message has been received or a non-timeout error has occured
            //
            // Note: This program was written for the Beaglebone Black. The BBB UART driver
            // (8250_omap.c) has a peculiar behavior where it will only read, at most, 48 bytes at
            // a time before triggering an interrupt and returning the bytes to the `read` caller.
            // As a result, we'll continue to make `read` calls until either a) we read less than
            // 48 bytes in one go, or b) the read call returns a timeout
            let mut packet = vec![];
            loop {
                let mut buffer: Vec<u8> = vec![0; MAX_READ];
                match conn.read(buffer.as_mut_slice()) {
                    Ok(num) => {
                        buffer.resize(num, 0);
                        packet.append(&mut buffer);

                        debug!("Read {} bytes from radio", packet.len());

                        if num < MAX_READ {
                            return Ok(packet);
                        }
                    }
                    Err(ref err) => match err.kind() {
                        ::std::io::ErrorKind::TimedOut => {
                            if packet.len() > 0 {
                                return Ok(packet);
                            } else {
                                break;
                            }
                        }
                        other => bail!("Radio read failed: {:?}", other),
                    },
                };
            }
        }

        // Sleep for a moment so that other threads have the chance to grab the serial port mutex
        thread::sleep(Duration::from_millis(10));
    }
}

// The write function that the comms service will use to write messages to the "radio"
//
// This function may be called from either a message handler thread or from a downlink endpoint
pub fn write(conn: &Arc<Mutex<RefCell<serial::SystemPort>>>, msg: &[u8]) -> ServiceResult<()> {
    let conn = match conn.lock() {
        Ok(val) => val,
        Err(e) => bail!("Failed to take mutex: {:?}", e),
    };
    let mut conn = conn.try_borrow_mut()?;

    conn.write(msg).and_then(|num| {
        debug!("Wrote {} bytes to radio", num);
        Ok(())
    })?;

    Ok(())
}

fn main() -> ServiceResult<()> {
    // Initialize logging for the service
    Logger::init("radio-service").unwrap();

    // Get the main service configuration from the system's config.toml file
    let service_config = kubos_system::Config::new("test-comms")?;

    // Pull out our communication settings
    let config = CommsConfig::new(service_config)?;

    // Initialize the serial port
    let conn = serial_init(BUS)?;

    // Set up the comms configuration
    // In this instance, reading and writing are done over the same connection,
    // so we'll just clone the UART port connection
    let read_conn = conn.clone();
    let write_conn = conn;

    let control = CommsControlBlock::new(
        Some(Arc::new(read)),
        vec![Arc::new(write)],
        read_conn,
        write_conn,
        config,
    )?;

    // Set up our communications telemetry structure
    let telemetry = Arc::new(Mutex::new(CommsTelemetry::default()));

    // Start the comms service thread
    CommsService::start::<Arc<Mutex<RefCell<serial::SystemPort>>>, SpacePacket>(
        control, &telemetry,
    )?;

    // TODO: Start the GraphQL service
    loop {}
}
Testing
The SDK is packaged with a client to help test our new UART comms service, uart-comms-client.
This client program will take the input data, wrap it in a UDP packet, and then send it over the requested serial device.
Note
If you are using a local development environment, instead of an instance of the SDK, you’ll need
to clone the repo and navigate to the uart-comms-client folder.
You’ll then run the program with cargo run -- {command args}.
The program has the following syntax:
UART Comms Client

USAGE:
    uart-comms-client [OPTIONS] <data> -b <bus> -p <port>

FLAGS:
    -h, --help       Prints help information
    -V, --version    Prints version information

OPTIONS:
    -b <bus>              Serial Device
    -f <file>             File containing data to send
    -p <port>             Destination port

ARGS:
    <data>    Data to send
Setup
Software
Build the comms service, being careful to cross-compile for the target OBC, then transfer the binary to the OBC.
Information about building and transferring Rust projects can be found in the Getting Started with KubOS and Rust doc.
Once transferred, log into the board and start the service. Leave this connection to the OBC open so that you can view the service’s output
Hardware
Connect an FTDI cable between the OBC’s UART port and your PC. At a minimum, the FTDI’s ground (black), TX (orange), and RX (yellow) lines should be connected.
If you are using an instance of the SDK, the cable should automatically be detected by the SDK and
given an alias of /dev/FTDI.
Note
If you have more than one FTDI cable connected, you will have to identify and use the correct
/dev/ttyUSB* device instead.
If you are using a local development environment, refer to the comms setup doc instead in order to set up communication.
Execution
To start, we’ll send a simple telemetry request to the telemetry service running on the OBC. By default, the telemetry service uses port 8020 for GraphQL requests.
From the SDK, run the following command:
$ uart-comms-client "{telemetry(latest: 10){subsystem, parameter, value}" -b /dev/FTDI -p 8020
Or, from your local dev environment:
$ cargo run -- "{telemetry(latest: 10){subsystem, parameter, value}" -b /dev/FTDI -p 8020
You should see the following output:
Response: {"data":{"telemetry":[]},"errors":""}
Note
It is possible that data will be dropped during the transfer process.
This will be indicated by an output message of Error: ErrorMessage { msg: "Checksum mismatch" }.
If this occurs, re-run the client command.
Troubleshooting
If the client program times out (indicated by Error: ErrorMessage { msg: "Timed out waiting for response" }),
check the following:
- Communications service is running on the target OBC
- Telemetry service is running on the target OBC
- OBC’s UART port is correctly wired to the user’s PC
- Destination IP given to the client matches the
ipparameter in the service- Port given to the client matches the port of the telemetry service (this is defined in the systems
config.tomlfile. The default location is/etc/kubos-config.toml)
GraphQL
To finish the communications service, we want to expose all telemetry data collected through a GraphQL front-end.
The telemetry structure, CommsTelemetry, has the following fields:
packets_up- Number of packets successfully uplinked (transferred from a client to the service)packets_down- Number of packets successfully downlinked (transferred from the service to a client)failed_packets_up- Number of bad packets received from a clientfailed_packets_down- Number of packets the service failed to write to a clienterror- General list of errors which have occurred within the service
We’ll create two new files to handle the GraphQL portion of the service: model.rs and schema.rs.
Schema
The schema file defines the front-end queries that will be available. We’ll also need to define a mutation section (which will remain empty for now) in order to be able to compile the program.
The file should look like this:
use juniper::FieldResult;
use crate::model::Subsystem;

type Context = kubos_service::Context<Subsystem>;

pub struct QueryRoot;

graphql_object!(QueryRoot: Context as "Query" |&self| {
    // Test query to verify service is running without attempting
    // to communicate with the underlying subsystem
    field ping() -> FieldResult<String>
    {
        Ok(String::from("pong"))
    }

    // Request number of bad uplink packets
    field failed_packets_up(&executor) -> FieldResult<i32>
    {
        Ok(executor.context().subsystem().failed_packets_up()?)
    }

    // Request number of bad downlink packets
    field failed_packets_down(&executor) -> FieldResult<i32>
    {
        Ok(executor.context().subsystem().failed_packets_down()?)
    }

    // Request number of packets successfully uplinked
    field packets_up(&executor) -> FieldResult<i32>
    {
        Ok(executor.context().subsystem().packets_up()?)
    }

    // Request number of packets successfully downlinked
    field packets_down(&executor) -> FieldResult<i32>
    {
        Ok(executor.context().subsystem().packets_down()?)
    }

    // Request errors that have occured
    field errors(&executor) -> FieldResult<Vec<String>>
    {
        Ok(executor.context().subsystem().errors()?)
    }
});

pub struct MutationRoot;

/// Base GraphQL mutation model
graphql_object!(MutationRoot: Context as "Mutation" |&self| {

});
Model
The model file is used to define the back-end functions which fetch the actual data requested.
Each function will take ownership of the telemetry structure’s mutex and then return a particular field.
The file should look like this:
use comms_service::CommsTelemetry;
use std::sync::{Arc, Mutex};

#[derive(Clone)]
pub struct Subsystem {
    telem: Arc<Mutex<CommsTelemetry>>,
}

impl Subsystem {
    pub fn new(telem: Arc<Mutex<CommsTelemetry>>) -> Subsystem {
        Subsystem { telem }
    }

    pub fn failed_packets_up(&self) -> Result<i32, String> {
        match self.telem.lock() {
            Ok(data) => Ok(data.failed_packets_up),
            Err(_) => Err("Failed to lock telemetry".to_owned()),
        }
    }

    pub fn failed_packets_down(&self) -> Result<i32, String> {
        match self.telem.lock() {
            Ok(data) => Ok(data.failed_packets_down),
            Err(_) => Err("Failed to lock telemetry".to_owned()),
        }
    }

    pub fn packets_up(&self) -> Result<i32, String> {
        match self.telem.lock() {
            Ok(data) => Ok(data.packets_up),
            Err(_) => Err("Failed to lock telemetry".to_owned()),
        }
    }

    pub fn packets_down(&self) -> Result<i32, String> {
        match self.telem.lock() {
            Ok(data) => Ok(data.packets_down),
            Err(_) => Err("Failed to lock telemetry".to_owned()),
        }
    }

    pub fn errors(&self) -> Result<Vec<String>, String> {
        match self.telem.lock() {
            Ok(data) => {
                Ok(data.errors.to_owned())
            }
            Err(_) => Err("Failed to lock telemetry".to_owned()),
        }
    }
}
Main Logic
We can now define and start our GraphQL front-end in the main code:
#[macro_use]
extern crate juniper;

mod schema;
mod model;

use crate::model::*;
use crate::schema::*;

use kubos_service::{Logger, Service};

fn main() -> ServiceResult<()> {
    // Initialize logging for the service
    Logger::init("radio-service").unwrap();

    // Get the main service configuration from the system's config.toml file
    let service_config = kubos_system::Config::new("radio-service")?;

    // Pull out our communication settings
    let config = CommsConfig::new(service_config.clone())?;
    debug!("Config: {:?}", config);

    // Initialize the serial port
    let conn = serial_init(BUS)?;

    // Set up the comms configuration
    // In this instance, reading and writing are done over the same connection,
    // so we'll just clone the UART port connection
    let read_conn = conn.clone();
    let write_conn = conn;

    let control = CommsControlBlock::new(
        Some(Arc::new(read)),
        vec![Arc::new(write)],
        read_conn,
        write_conn,
        config,
    );

    let telemetry = Arc::new(Mutex::new(CommsTelemetry::default()));

    // Start the comms service thread
    CommsService::start::<Arc<Mutex<RefCell<serial::SystemPort>>>, SpacePacket>(control, telemetry.clone())?;

    // Start the GraphQL front-end
    Service::new(service_config, Subsystem::new(telemetry), QueryRoot, MutationRoot).start();

    Ok(())
}
Testing
Now that the code is complete, we can use our communications service to send a query to itself:
$ uart-comms-client -b /dev/FTDI -p 8150 "{packetsUp,packetsDown,failedPacketsUp,failedPacketsDown,errors}"
Response: {"data":{"failedPacketsDown":0,"failedPacketsUp":0,"packetsDown":4,"packetsUp":5},"errors":[]}