Installing Kubos Linux on a Pumpkin Motherboard Module 2
Overview
This document covers the steps required to install Kubos Linux onto a Pumpkin MBM2.
Reference Documents
Pumpkin Documentation
The CubeSat Kit Motherboard Module (MBM) 2 reference document is available from Pumpkin and is a useful document for learning what each of the hardware components are and how they are connected.
Kubos Documentation
- Getting Started with KubOS and the Kubos SDK - Basic tutorial for creating your first Kubos SDK project
- Kubos SDK Cheatsheet - Overview of the common Kubos SDK commands
- Using Kubos Linux - General guide for interacting with Kubos Linux
- Working with the Pumpkin MBM2 - Guide for interacting with MBM2-specific features
- Building Kubos Linux for the Pumpkin MBM2 - Steps to build Kubos Linux
Components
The Kubos Linux installation process is composed of two high-level steps:
- Flashing the eMMC
- Flashing the microSD card
To perform a full default installation, two files are needed:
- A Kubos Linux SD card image
- An aux_sd image
All of these files can be obtained from our Kubos Linux Releases page on GitHub
Download the latest KubOS-v{version}.tar.gz file and then unzip the files for the Pumpkin MBM2. They’re located in the KubOS-v{version}/Pumpkin-MBM2 folder.
Pre-Requisites
- Obtain an SD card that is at least 4GB.
Note
The Kubos Linux SD images are created for a 4GB SD card. The image can be applied to a larger SD card, but the resulting system will still only have 4GB of space available to it.
- Install Etcher. Other software to flash SD cards does exist, but Etcher is the Kubos software of choice.
- Obtain the SD card images
Install the eMMC Image
Flash the SD Card
Using Etcher:
- Select the Kubos Linux image to flash
- Make sure the SD card device is correct (may be auto-detected if there is only one SD card present in your system.)
- Click the “Flash!” button to start the flashing process
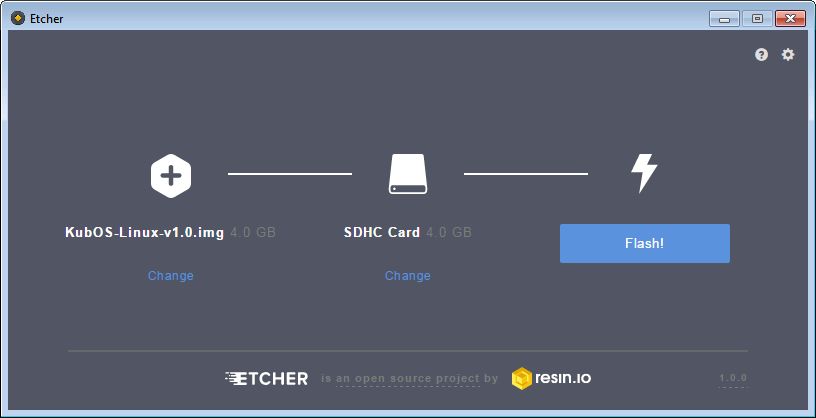
Etcher Setup
It should take roughly 10 minutes for a 4GB image to be loaded onto an SD card.
Once the program has finished successfully, the SD card is ready to be inserted into the Pumpkin MBM2’s microSD slot.
Boot into U-Boot
Note
These instructions should work whether you’re currently running Kubos Linux or some other Linux distribution.
We now want to overwrite the eMMC, so we’ll need to use U-Boot in order to boot Kubos Linux from the SD card.
You’ll need to establish a serial connection with the board in order to connect to the console.
Hold down any key while the board is booting. This will exit out of the auto-boot and bring up the CLI.
U-Boot 2016.09 (Jul 17 2017 - 11:43:29 -0500)

I2C:   ready
DRAM:  512 MiB
MMC:   OMAP SD/MMC: 0, OMAP SD/MMC: 1
Net:   cpsw, usb_ether
Hit any key to stop autoboot:  0
U-Boot>
Copy/paste these commands:
setenv bootargs console=ttyS0,115200 root=/dev/mmcblk0p2 ext4 rootwait; fatload mmc 0:1 ${fdtaddr} /pumpkin-mbm2.dtb; fatload mmc 0:1 ${loadaddr} /kernel; bootm ${loadaddr} - ${fdtaddr}
This will cause the board to load Kubos Linux off of the microSD card, allowing us to flash the eMMC.
Flash the eMMC
To flash the eMMC, log into the board and then run the installation script, install-os.
It has been placed within the system PATH, so may be called from any location.
A confirmation dialog will be issued. Enter y to proceed with the installation.
You will see a variety of messages which will vary depending on the current state of the system (for example, whether you are currently running a version of Kubos Linux or some other distribution).
It should be safe to ignore any messages which are issued prior to the actual copying of data.
The installation script will produce a few informational messages prefixed with OS Install.
The resulting installation messages should look like this:
~ # install-os
** Warning ** This script will wipe out the current contents of the eMMC
Are you sure you want to proceed? (y/N)
y
OS Install: Pausing monitoring
OS Install: Stopping running services
OS Install: Prepping the file system
OS Install: Copying SD card contents over to eMMC. This process should take 10-15 minutes to complete
The four status LEDs on the board should start flashing in a random pattern. This indicates that the eMMC is currently being flashed.
The process should take roughly ten minutes, after which the LEDs should return to normal, with one LED blinking to indicate a successfully running Kubos Linux system.
The console should show a summary of the transfer:
7471104+0 records in
7471104+0 records out
3825205248 bytes (3.6GB) copied, 659.546105 seconds, 5.5MB/s
After this process has completed, shutdown and de-power the system.
Install the Auxiliary Image
Re-Flash the SD Card
Now flash the microSD card with the auxiliary SD card image (aux-sd.img). This image contains the
Kubos Linux upgrade partition and the second user data partition.
Once the flash process has completed, put the card back into the microSD slot and boot up the system.
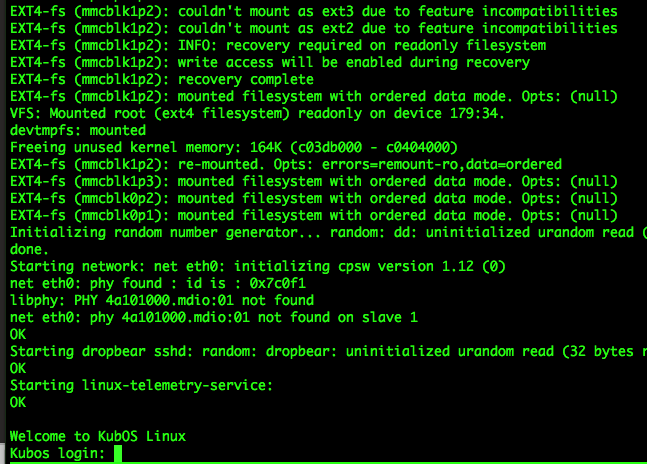
You will see messages as the data partitions are mounted. For example:
EXT4-fs (mmcblk0p2): couldn't mount as ext3 due to feature incompatibilities.
While they may seem like errors, they are a normal part of the boot process as the system detects the partition file type. If there are actual issues mounting a partition, the resulting error message will look like this:
mount: can't find PARTUUID=41555820-02
This example message is given when the system is unable to find the axilliary SD card’s second partition. This might be due to no microSD card being present, or the microSD card not being properly flashed with the auxilliary SD image.
If you see no such errors, the installation process is now complete.
Using Kubos Linux
For information on how to create and run applications on your new Kubos Linux system, see the Using Kubos Linux and Working with the Pumpkin MBM2 guides.